


One of the most important motivations and goals of the recent Bricktronics Software libraries upgrades was to make it much easier to use the Bricktronics hardware and software with other boards besides the Arduino Uno and Arduino Mega 2560. To this end, we’ll be testing out the new libraries with a variety of other boards in the coming weeks, and we’ll post a update for each one. This time we are looking at using the Bricktronics Shield with the Arduino Leonardo, a 5v compatible board very similar to the Arduino Uno, but with a few important differences:
The Leonardo differs from all preceding boards in that the ATmega32u4 has built-in USB communication, eliminating the need for a secondary processor. This allows the Leonardo to appear to a connected computer as a mouse and keyboard, in addition to a virtual (CDC) serial / COM port.
The ability to appear as a computer mouse or keyboard makes for a lot of cool possibilities! Want to make a simple LEGO keyboard? Use the BricktronicsButton library to read a series of touch sensors and type in different keystrokes for each sensor. You could use the mouse capability with the BricktronicsUltrasonic library to make a theremin-like mouse for your computer! (Actually I might have to make that mouse theremin someday, that sounds too cool to miss!)
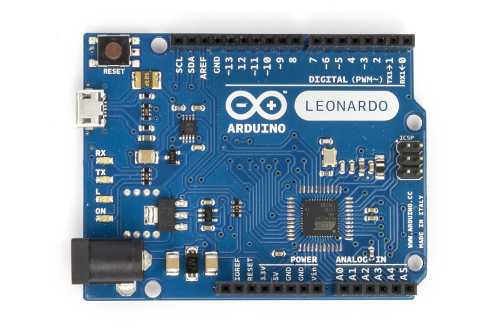
Image credit: “Arduino Leonardo Front with headers” by Arduino LLC, licensed CC-BY-SA 3.0
Since the Leonardo is Rev3 compatible, put the I2C select switch in the “Rev3” position.
Motors
Unfortunately, while the Leonardo has dedicated Rev3 I2C pins, it also has the I2C signals on the D2 and D3 pins, which are used by both motor 1 and motor 2. This means that the Bricktronics shield cannot use any motors without breaking the I2C communications with the on-board MCP23017 chip. However, it is still possible to use NXT and EV3 motors with the Arduino Leonardo using our new product the Bricktronics Motor Driver, currently in pre-release but available in our store. More details about this new product will be released in the next few weeks, but it lets you drive two NXT/EV3 motors with any 5 volt compatible, real-time microcontroller board.
Sensors
If no motors are plugged in, the I2C communication to the MCP23017 chip work perfectly, meaning that sensors will work just fine. We have tested all currently-supported sensors on the Bricktronics Shield on the Leonardo, and they work great! If you are looking for a sensors-only Bricktronics solution, then the Bricktronics Shield is a fine choice, as well as the Bricktronics Breakout Boards.
Bricktronics software updates – v1.2
We recently went through a significant refactoring of the Bricktronics software libraries for Arduino (and other platforms). The all-encompassing library was split into separate sub-libraries, one for each motor and sensor type, plus one library for the Bricktronics Shield and Megashield. We’re calling this new set of software libraries “Bricktronics v1.2”.
Highlights of the changes include:
- Complete API documentation for each library
- Addition of two new sensors: Color sensor and Light sensor
- Addition of better PID control for motors, including position control, angle control, as well as brake/coast functionality
- New examples for the new motor API functionality
- Now easier to use the individual libraries with other platforms such as ChipKit, Teensy, etc
- All library dependencies (such as required 3rd party libraries) are clearly mentioned in all examples and Readme files, including links and installation directions.
This is the list of the new individual Bricktronics software libraries. Unfortunately they are not compatible with the original libraries, but since they are better in every way, we strong recommend everyone upgrade to these new v1.2 libraries.
- BricktronicsShield – Support for the Bricktronics Shield (API docs)
- BricktronicsMegashield – Support for the Bricktronics Megashield (API docs)
- BricktronicsMotor – Support for NXT 2.0 and EV3 servomotors (API docs)
- BricktronicsLight – Support for NXT monochrome light sensors (API docs)
- BricktronicsColor – Support for color sensors (API docs)
- BricktronicsSound – Support for sound sensors (API docs)
- BricktronicsButton – Support for pushbutton sensors (API docs)
- BricktronicsUltrasonic – Support for the NXT 2.0 ultrasonic sensors (API docs)
We still have more website updates to make, including new photos, new examples, new demonstration videos, and new hardware(!) but we want to let you know about the new software libraries because we’re really proud of them. Please let us know what you think in the W&L Forum.
One of the features we wanted to add when re-designing the original metronome kit was to make it much easier for people to hack the kit, and add external connections. To this end, we added six header pin connections at the bottom of the circuit board:
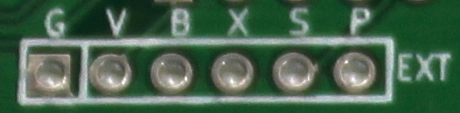
The rest of this post will be an explanation of what each of those pins is doing.
Once in a while we’ll get an email along the lines of, “Hey! What happened to the Bluetooth Arcade Controller? I couldn’t find it on your website or your store.” After answering a few of these recently, we decided to make a blog post about it here.
The Bluetooth Arcade Controller (BTAC) was the core component of a neat little project called “Coffee Table MAME Console” in Make Magazine vol 28, that let you build your own arcade-style control panel, and connect it to your computer or Raspberry Pi using a wireless Bluetooth connection.
The world of hobbyist-grade embedded bluetooth keyboard interfaces has advanced greatly in the past couple years since we created the BTAC kit, and it’s no-longer the best solution, in our opinion. We’d suggest trying Adafruit’s new Bluefruit EZ-Key product, which is better in every way (except for number of button inputs) than the BTAC. Plus it’s only $19.95.
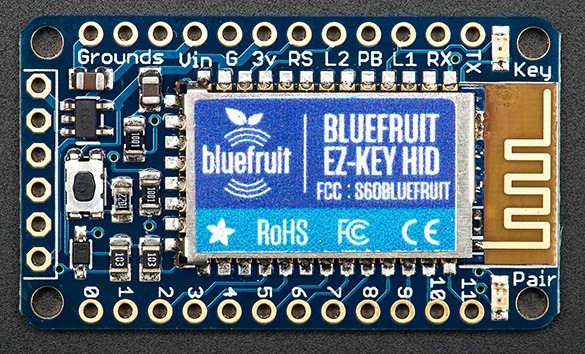
They even have some great tutorial documentation on how to get started with it.
If you need more than 12 inputs, you can connect the Bluefruit module to an Arduino Mega or other microcontroller and use the RX/TX connections to send ASCII characters to the bluetooth module, which will then transmit that character as a keypress to the computer. You can even do raw USB HID keyboard or mouse reports to properly handle up to six concurrent keypresses.
Also, you can re-map the default 12 inputs using an FTDI cable and a processing sketch.
At the end of the day, we suggest going with the Bluefruit EZ-Key, as it’s cheaper, more flexible, and all-around better than our Bluetooth Arcade Controller was.
2014 Retrospective
Wayne and Layne is a two person electronics company in Minneapolis. We design and sell electronic kits and projects for kids and adults, beginners and experts. Most of our products are sold online, but some of our products are sold in retail stores across the world!
So far, we’ve given away all our designs. This is so you can learn how we put it together, but we believe so much in giving the designs away that we’re willing to let you do anything with our designs–even to make your own kits for sale. We ask that if you use our designs, you give away your modifications too. (A link and some credit would be nice too!) This is called open source hardware.
We also do design work for other people, like Kickstarters and museum exhibits. Most of this work isn’t open source, but it helps fund our open source work. (We also explicitly reserve the right to release new products that are not open source.)
It might not look like it from our blog, shame shame, but 2014 has been an amazing year for Wayne and Layne! We finished a lot of awesome projects with clients, got an office, put a bunch of cool tools in it, worked on new products, and improved a lot of things behind-the-scenes. On top of that, we worked on open source software like Kicad that everyone can use for free, and your purchases of our products helps us volunteer!
You can follow us here, on Twitter at @wayneandlayne, and Adam and Matthew both have Twitter accounts: @adamwwolf and @mbeckler.
We have an office!
Up until April or so, all of Wayne and Layne was at Adam or Matthew’s apartments, and we’d meet with clients at coffee shops or hackerspaces. This worked great when Wayne and Layne was just starting out, but now that we’re more established, we were outgrowing the space we could carve out of our apartments. It also meant we had to buy twice as much of everything, or ship things around and it seemed like we never had what we needed where we needed it. Now that Matthew and Adam both live in Minneapolis, this seemed like a waste. This came to a head when Adam had to clear out his Wayne and Layne office to turn it into a nursery. (!!!) We tried storing all our inventory in a storage unit, continuing to work from our apartments, but after a month, we decided to look for an office. We looked at some online listings, then put the call out on Twitter, and it didn’t take long before we found a great spot.
We have some space in Minneapolis that isn’t fancy but
- has a great landlord
- is on good bus lines
- we can afford
- is across from a Chinese place that serves xiao long bao
so really, we can’t ask for more!
We have some awesome equipment in our office!
In our new space, we have a pick and place machine, reflow oven, hot air station, stereo microscope souped up for assembly, as well as a laser cutter, an Othermill, and a reliable 3D printer! We also have less fancy equipment, like a shipping station with label printer, laser printer, scale, and barcode scanner. We don’t plan on doing large manufacturing runs in our space, but we’ve definitely leveled up on the prototyping we can do in-house!
We finished our work on the Choosatron!
The Choosatron is a little interactive fiction gaming device funded on Kickstarter. Jerry brought us in before the Kickstarter launched to help with the PCB layout and to help design for manufacturing. It’s just about ready to ship, and it’s turned out even better than we expected.
We made more museum exhibits!
We continued our partnership with a local museum exhibit design company, and helped with lots of new exhibits. Our exhibits this year are all over the US, including right here at the Minnesota State Fair! We had our hand in quite a few of the exhibits you see in the Energy Building. With the museum exhibits, we began to see some patterns in our “one-off†designs, and are investigating how to turn some of those into products. We have some exciting news about our partnership, but can’t reveal it yet. (You can see examples of our museum work at http://www.wayneandlayne.com/exhibits/)
We invented new wearable visual effects with Dessa!
We did a pair of projects with Dessa! We had talked previously on a project that fell through due to scheduling issues with overseas suppliers. This year, she came to us with some rough ideas of wearable visual effects she wanted for a show. (One idea was a still from a cartoon.) We completely blew it out of the water! Everyone was really impressed (including us) by how awesome they turned out. More details here!
We presented at Maker Faire NY!
We were unable to make it to Maker Faire SF this year–Adam was too close to becoming a new dad that his wife couldn’t fly and he couldn’t risk being away, but we did make it to Maker Faire NYC in September. We gave two presentations, one on Lego and Arduino robotics, and another on low-cost pick-and-place machines where we announced our Kicad-to-TM240A converter program.
We supported open source software, like Kicad!
We often write patches for bugs we find in the software we use. We have a one or two line patch in Jenkins, for example. We don’t really keep track of those.
However, in 2014, there were some changes to the Kicad leadership, and we’ve been much more involved since then. We have been spending *lots of hours* since September working on getting usable Mac builds coming out of a continuous integration server. There is a Kicad dev team priority of an official “stable†release on Windows, OS X, and Linux. We’ve got team buy-in on a real feature freeze before stable release–it’s going to be slick, folks! Combined with the amazing work that CERN is doing, like the push-and-shove router, OpenGL acceleration, and the upcoming RF improvements, we are extremely excited to see what Kicad looks like at the end of 2015!
Some of the stuff we did is completely behind the scenes, for example:
We redid all our internal infrastructure.
We completely revamped almost all of our internal infrastructure. This doesn’t mean a lot to you, but we have an easier time getting the right stuff done that we need to in order to be successful. Our revamp also dramatically increases our disaster recoverability. After we did this, we had a 1TB SSD containing ten virtual machines completely die without warning, and we were back up and running within an hour or two! (With no website interruption, I might add!)
This was by no means a complete list of our work this year, just the highlights.
Quick ones:
- Adam wrote two chapters for an upcoming book, “Maker Proâ€: an interview with Emile Petrone of Tindie, and an essay about the Blinky Grid and Blinky POV retail launch.
- We taught a weeklong class at Leonardo’s Basement to teenagers on Minecraft and digital logic. We built things in Minecraft with Redstone, and in real life with breadboards, LEDs and switches, and 7400 logic chips.
- We taught a half-day class on working with EL wire at Leonardo’s Basement.
- Adam went to PyCon for the first time, and started a “Python + Embedded†room.
- We’re on an advisory board for an unannounced project that you’ll definitely hear about in 2015!
What’s coming up?
We don’t like to announce our stuff too far ahead of time, but we’re far enough along in some projects that we’ll let them slip out here:
- New Bricktronics hardware and software
We did a lot of Bricktronics work this year. We have new Bricktronics (our LEGO Mindstorms + Arduino line) products ready to be released. They’re waiting on the other cool Bricktronics thing we did this year, which was to revamp the software support and make it even more beginner friendly, while opening up some more options for more advanced programmers. This new software support relies on some features of the Arduino IDE which are not available in the official builds, but is coming soon. - A stable, usable OS X Kicad release
- More products, and a new product line
We’re excited to get back to our roots with new products! - More museum exhibits
- A new website
- A new shipping backend
This is probably boring to you, but it means means more accurate (cheaper) shipping, order status notifications, and your order will go from ordered to shipped even faster!
That’s about all–I have a brand-new Othermill to play with when I’m done with this post.
Happy hacking, folks!
blink(1) is an open source hardware USB RGB LED indicator by ThingM. I wrote a plugin “Run After Tests” for IntelliJ-based IDEs like PyCharm and CLion so it can display the status of your tests as different colors.

blink(1), an open source hardware USB RGB LED
The blink(1) has a variety of control mechanisms, including a command-line tool, blink1-tool. It’s as open source as things come, really, and it’s by Mike Kuniavsky and Tod E. Kurt. I’ve talked with Tod a few times–we were stationed in the Maker Shed next to each other at a few Bay Area Maker Faires, so when I saw a tweet where someone got blink(1) working with a Ruby IDE to indicate test status, I decided to extend the blink(1) ecosystem and write a plugin for my favorite IDEs.
While I still write a lot of code in vim, if I’m not in vim, I’m in PyCharm or CLion. PyCharm and CLion are tools by JetBrains, and are based upon the IntelliJ IDE. IntelliJ is written in Java, something I don’t particularly enjoy working with, but it’s a testament to how great PyCharm and CLion are that they don’t trigger my Java allergy.
Today, I spent a little more than an hour, opened some docs, and wrote an IntelliJ plugin “Run After Tests” for automatically running arbitrary commands after a test suite completes, with one configuration for when all the tests pass, and a second configuration for one when some of the tests fail. It seems to work for me.
I can see this being used a few different ways–including with blink1-tool so I can see the status of my tests at a glance!
I have posted the project and a binary release, and I’d appreciate some feedback. I would like to submit it to the JetBrains Plugin Repository, but I want to make sure the tool works for other folks first.
After writing the plugin and testing it, I purchased two blink(1)s. As soon as they arrive, I’ll update the post with the two commands you’ll need to get this working with a blink(1).
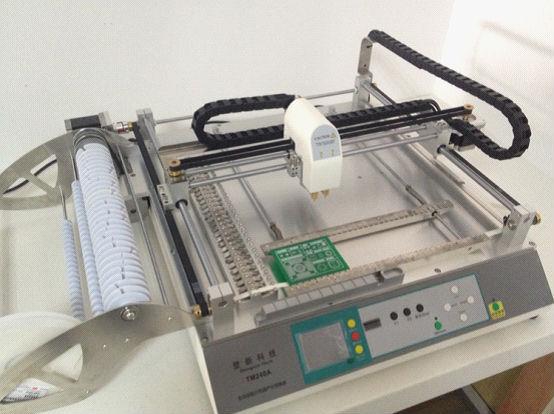
In the summer of 2014, Wayne and Layne purchased a Pick-and-Place machine, specifically the Neoden TM-240A. After doing a few small prototype production runs, we decided to create a presentation at the 2014 World Maker Faire in NYC, to share the tips and tricks we’ve learned about working with this PnP machine, as well as an honest analysis of its capabilities, strengths, and limitations. You can also download our slides (PDF). The PDF slides don’t include the embedded video, but that video has been posted to YouTube.
The Pick-and-Place machine needs to know where to place each part, and we have created some software to help convert the PCB design data from our favorite ECAD tool, KiCad, into the proper file format needed for these PnP machines. The documentation for this software is below. We hope that it’s useful for your needs.
tm2x0
tm2x0 is a Python package for working with Neoden TM220A and TM240A pick and place machines.
It currently has a script for generating a .CSV input file for the PnP from a KiCad .pos file, using an interactive command-line menu.
It was developed by Adam Wolf and Matthew Beckler of Wayne and Layne, LLC, with no affiliation with Neoden other than we own one of their machines.
Installation
tm2x0 is a Python module. You should be able to install it through pip or however you normally install Python modules.
Let us know if you have problems.
Steve over at Big Mess O’ Wires wrote up a nice review of our Blinky POV kit. A few excerpts are below, you can read the whole thing at the Big Mess O’ Wires blog post.
My oldest daughter Alice has an occasional interest in electronics, and as her dad I try to encourage her without becoming too annoying. We’ve done some past projects like Snap Circuits experiments, building a Drawdio pen, and constructing an animated Halloween LED display. Recently we had a chance to build a Blinky POV from Wayne and Lane. Or more accurately I should say she had a chance to build it, since my role was limited to talking her through the steps and taking photos. It’s impressive what an 11-year-old can do with a soldering iron!
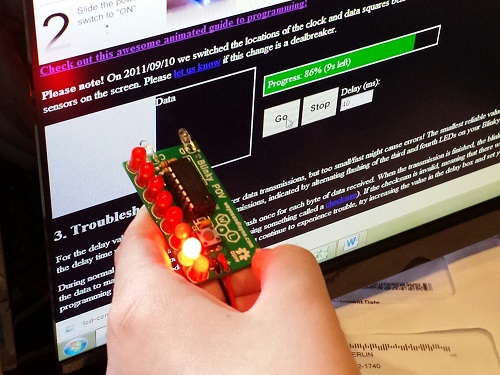
The main reason I selected Wayne and Lane’s Blinky POV instead of another similar one was the novel method used to program it. Instead of a PIC programmer, a serial connection, or some other conventional interface, it uses a pair of photo sensors to program new messages using flashes of light. Go to the Blinky Programmer web page, design some pixel or text-based messages, and click “goâ€. A clever bit of javascript flashes two squares on the screen, and when the Blinky POV is held near these flashing squares, it reprograms the stored messages in about 30-60 seconds. In our experience this method was very reliable, and much less hassle than dealing with virtual serial ports or other wired interfaces. And it actually made programming fun – like magic! The web page interface is surprisingly versatile, too. You can design pixel art or text messages, adjust the scrolling speed, switch between multiple stored messages, and define what should happen at the end of each message.
This is starting to sound like a Wayne and Lane commercial, so I should probably add that I have no affiliation with them other than being a satisfied customer. If there’s a young builder in your life who might enjoy a simple but fun-filled electronics project, give Blinky POV a try.
Read more: http://www.bigmessowires.com/2014/01/12/building-the-blinky-pov/
Xander at Bot Bench wrote up a nice review of our Bricktronics Breakout Boards:
These adapters would definitely be indispensable if you’re planning to do any kind of tinkering with your Arduino and whatever NXT peripherals you had in mind.
I had a lot of fun putting them together and they plugged into the breadboard very easily and sat very snugly afterwards. They’re very reasonably priced at just $4 a piece. They come with the required 82K Ohm resistor, which you will need for the pull-up.
Read more: http://botbench.com/blog/2014/01/12/bricktronics-breakout-board/
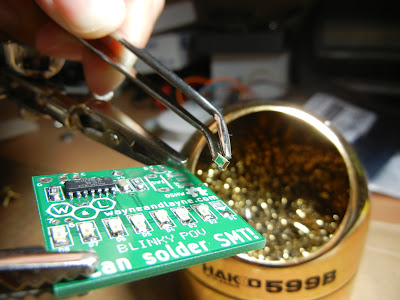
MobileWill posted a great review of our Blinky POV SMT kit!

The Blinky POV SMT is similar to the Blinky GRID but it only has one row of LEDs. By waving the Blinky in the air you can see the design/text due to the effect of persistence of vision. This happens because your retina sees the image slightly longer than it is being displayed. Read more about persistence of vision.
Last Thursday I came home and there it was, waiting for me to rip it open! Since I was leaving for a weekend trip, I decided I would assemble it that night so I could show it off. So at 10:30pm I got started.
Read more: MobileWill: Blinky POV SMT